Saturday 25 December 2010

Christmas 2010

Well is Christmas and snowing again. 1 year on and a lot has happened so I thought is would be good to recap on a few of the achievements this year.
So this year then, well we've built a shed..Described as:
And the house:
  • Put in the first floor oak beams and floor board
  • Made and fitted the rest of the windows
  • Built the internal walls downstairs
  • Connected the electricity
  • Plumbed and fitted the downstairs bathroom
  • Dug and installed the fosse and pumping station
  • Built the laundry
  • lined the chimney and fitted the Esse
  • Lined and insulated the kitchen walls
  • Rebuilt various sections of stone wall
  • Made two bathroom cabinets, a kitchen table, one internal door and three workbenches.
  • All the other stuff to enable the above....
Not sure whether that sounds a lot or a little, but either way its been a lot of work. Added to that of course there has been all the other administrative stuff associated with moving to a new Country and settling two young children into the local schools.......

Well there's plenty more to do, so after Christmas it's back to the grindstone

Monday 6 December 2010

Bench2

So here it is my new workbench. Its a little more expedite than Julia's but hey its made up of all the bits of wood I had lying around. That said its fully functional and everything is easily to hand, bench peg, hammers and the skin under the bench is made from Colin Slingsby's old poof (I kid you not).

And I've even started using it. I have to say it is lovely to have a workspace of my own. Recently I'v been using Julia's bench and its very difficult since everyone arranges their tools differently and then when you come back everything is in a different place! Its also fair to say that Julia was even less happy with the arrangements than me. Still peace descends once more as we each have our own bench......and relax. 

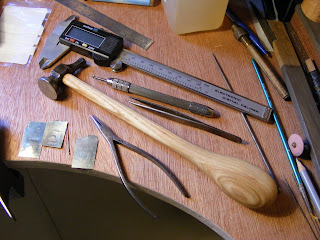
While I was looking round for a set of tools and splitting up some of the spare tools on Julia's bench, I came across a few little treasures  which I have re-furbished. The set shown below were given to be by a very good friend before we left for France. There was a good few boxes of tools including the ones below. The hammer  I've made a new shaft for in ash, and looks and works great. Incidentally the ash came from a broken axe handle so even that was "recuperated". The pliers have been lovingly re-polished (using the polishing motor given to me at the same time) and look fab too. They have a lovely fine point unlike the modern ones you buy today. 

My dad was a great one for finding old tools and repairing them, in fact his favourite screwdriver he found in a skip! He found the process of taking something unused and making is useful again very satisfying and I have to say I have too.


And here is the start of my pendant. Its obviously a work in progress but I thinks it's going to work out alright

I'll post the finished article on my next post and you can judge for yourself.

And here is one I made (much) earlier modelled by my lovely daughter


Tuesday 30 November 2010

Home Sweet Home 2

OK its not finished but at least we can now use the kitchen. The things we have working now are: Toilet, shower, hot water, range cooker, kitchen sink, washing machine, fridge and freezer. Is there anything else?


The laundry....LE GRAND LUX


That's the bench our good friends Mark and Julie gave us, covered in duvet and a throw.


My stud wall between the kitchen and the laundry / bathroom

The table in action
The shed on a very cold -8 deg foggy morn

And I've made myself a new work bench. Today I installed the bench in the shed,  just need a desk lamp and I am up and running.

We do take the internet for granted now, but it is amazing! Yesterday Julia sold a piece of jewellery to a guy in Australia! 10 years ago the prospect of living and working in deepest darkest Normandy and (hopefully in time) making a living selling jewellery all over the world would have been inconceivable. Now whilst not quite a reality it is at least in reach! God bless the internet.

Oh and one last thing, I really love my ESSE IRONHEART! It cooks brilliantly, warms the whole house and looks great. If you have space for one, buy one, trust me you won't regret it
,

Monday 15 November 2010

Finished Table

So here is my latest creation. Its taken about a week but its finished and marks a bit of a landmark. One of the things I was really looking forward to was being able to spend time with my lovely family sat around our big table, and now we have it. This and the esse will be the centre of our house as oppose to the television (no still don't have one). Size wise its about 7ft in old money, big enough for the odd dinner party. Ho here it is: Enjoy. As its taken quite a bit of work I'm likely to get a bit spoddy later on in the post but for those who prefer the their bloggs a little lighter you can look at the pictures and then quit here!


There are a handy 3 drawers to store the cutlery.


As and aid memoire here a liitle about the construction. Two of the legs are cut from the old roof timbers while two are bits left over from putting in the first floor. The drawer fronts are made from one piece of oak donated buy Julia's dad a few years ago. I think it was an off cut from a staircase he was making that was destined for the fire. The grain was (is) beautiful but as a short piece difficult to know what to do with. Well I think this is the perfect use on the piece. The drawer bottoms are from an old shop fitting that we were given when some friends moved to New Zealand. The drawer sides are from some oak my dad had lying around. So all in all quite a lot is reclaimed. The new wood cost around 50 euro from the saw mill down the road and has been drying in the loft for about a year. Screws, sandpaper, stain and was cost around 70 euro. So for 120 euro i think its not a bad effort, though I say so myself!

The design is clearly English rather than French but hey the stove's English too and I guess so am I. It started out as a rustic farmhouse table but as I found its remarkably difficult to make something very rustic if at heart your a little bit of a perfectionist. The dovetails in the draws are an example: When you cut a dovetail your natural tendency is to cut the best dovetail you can. The problem is if you do a good job they look like they are machine made! If you make a nice table top it's very difficult to then go back and "distress" all your good work. The result is that the table is not so much "rustic farmhouse" so much as "baronial hall". Ho hum!

For those who care (probably no one but me) all the screws used underneath to fix the top etc. are all old style slotted wood screws ( I hate to see cross head screws used in any furniture even when they are under the table and hidden.). The best bit of the table is of course secret but since my wife has already mentioned it once on her blog there's no harm done mentioning it here as well. As to the details I can't say here. If I invite you round for dinner then I may show you (maybe). Finally here are a few pictures of the construction.


Wednesday 10 November 2010

Table

Well I've been making a table for the house. The legs are reclaimed oak from the old roof and the rest is wood that has been drying for the last year or so. Of note; the reeding and stopped chamfers are all either scraped or cut by hand. Dovetails for the drawers (again hand cut). You don't really get a sense of the scale in the unfinished state but I'll post more pictures at we progress!


Note the old rope trick in place of clamps!


Cheap set of straps from the supermarket. I've used them for everything from strapping stuff to the trailer to impromptu clamps.


Here's Kitty. Arrived one day and now won't go away. As Metallica put it: "just like the curse, just like the stray. You feed it once and now it stays. Now it stays...."

Wednesday 29 September 2010

esse ironheart boiler removal

The esse ironheart comes in two flavours, EW and EWB the latter having a side plate boiler for hot water and one rad. Now this is great but esse do not recommend running the boiler dry, so if you want to run the esse before you have installed all the necessary pipework and tanks etc you need to take it out. Hear's how I did mine. Please note that this is not the official method but I did take advice from esse before I started.

Step one
Remove the left hand outer side plate by first removing the two M6 set screws at the bottom edges using a 10mm socket. Having removed the two screws the plate will slid up and then off. Mine was quite a tight fit at the bottom so be patient.

Step two
This will then reveal the inner side plate and boiler tappings.

The inner side plate is held onto the stove frame with 9 m6 set screws and the boiler itself is held to the side plate using one 12mm nut. In addition to this the tapping's a sealed around the plate using fire cement.

Step three
Chip away the fire cement from around the tappings

After which they should look like this

Step four
Next you can remove the centre 12mm nut and the 9off 10mm screws holding the side plate in position. Warning! the side plate is heavy so leave the bottom centre one till last to support the plate. After this is removed you can get a good look at the boiler.

Step five
Chip away any fire cement holding the boiler to the frame using a small chisel or sharp screwdriver (not your best one). The boiler will then lift out of the frame.

To do this you will need to have removed the grate bottom iron plates and the steel baffle. (note the baffle is the plate that forms the top of the fire box. Push is upward slightly at the back and then pull out the back fire brick. The baffle can then be lowered at the back and then pulled out. If you have difficulty pulling the rear fire brick out; screw a small wood screw into the vermiculite block and use the screw to grip the block)


And here she is

Step six
Make up some blanking plates to fill the holes in the inner plate left by the boiler tappings and centre bolt. I used 2mm steel plate and some bar to hold the plate central in the hole

Shown are the components for one plate (inner outer and centre spacer) That are then bolted together like a sandwich

And sealed with fire cement

Step seven
Having filled all the holes you can now replace the inner plate.

Then of course the outer plate.
Step eight
Having removed the boiler you will be short of a few fire bricks to fill the hole where the boiler was. These are easily obtained by ringing esse and ordering over the phone or on the webside. What you need is what they call a "full vermiculite set" Technically you only need 4 out of the set of 8 but they only sell then as a pack and at £48 quid they not outrageously expensive (they will even ship them to France for you).
When the set arrives you will need to do a bit of "fitting". Firstly to rebate to fire brick where the bolts for the blanking plates stick out. To do this place the bricks in place

Then give them a bit of a bash against the wall of the stove

Take them back out and the heat of the bolt will have left an imprint in the back of the fire brick

Which you can then drill a hole the depth of the nut using a wood drill by hand

Like this


The last thing to "fit" is to plane a bevel on the bottom edge of the three side bricks to clear the welds on the frame


Step Nine
Replace the fire bricks

and the steel baffle

And finally the back fire brick. The baffle hooks over the front and then pushes up to the top rear fire brick. The lower rear fire brick then pushes to the back of the stove and supports the rear of the baffle

Step 10
Refit the grate. In my case this a the wood only "Dutch Grate" option. This replaces the multi fuel grate supplied as standard.

Last but not least you can then stand back admire you work and light up your esse ironheart for a nice cup of tea!

Or even indulge in some mood lighting: